Universal Asynchronous Receiver/Transmitter
Overview
The Maker-E is meant to be accessible to community members of all types, from all backgrounds. While the equipment and resources in the lab are inherently electrical and computer engineering based, the goal is to allow those without years of coursework in electrical and computer engineering to equally access the space. To this end, technology kits were devised to allow makers ways to quickly bootstrap themselves on widely used technologies. Technology kits provide makers with a bit of background information, an easy to follow tutorial, and all of the physical equipment necessary to implement the tutorial so that by the time the maker finishes the going through the kit, they have a base knowledge of how a technology works and how it is implemented.
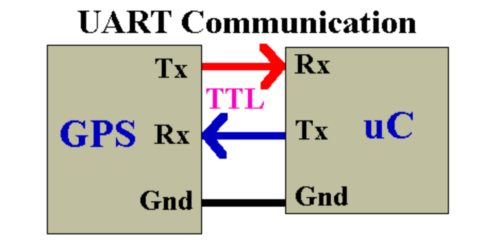
This technology kit is meant to teach makers the Universal Asynchronous Receiver Transmitter (UART) protocol. This protocol is used widely throughout the electrical and computer engineering world, providing a cheap, flexible, and easy to implement way for components to talk to each other. The major components of how UART works are provided in the kit, found here.
Implementation
The toughest balance to walk in creating all of these kits was to give the user enough information to get them working on a technology without overloading them and making the kit cumbersome. This was especially challenging knowing that this kit was targeted to a wide array of users, from those unfamiliar to computing systems other than their basic desktops to hardened electrical and computer engineering students. In this kit, I tried to focus on providing limited information on how UART is actually implemented, and focused a bit more on how a maker could go about using it in their project.
For most of our technology kits, we implemented the tutorials using the TI MSP430 launchpad. This is a fairly straightforward and accessible development kit. In this tutorial, we simply wanted to send a message to the MSP430, have it do something based off of this message, and return a response message. In practice, we had the user send the keystrokes ‘R’, ‘G’, ‘r’, or ‘g’. If the letter was capital, the MSP430 would turn on its corresponding LED (‘G’ for green and ‘R’ for red). If it was lower case, it would turn off that corresponding LED. The MSP430 then sent a message back to the user saying which key was pressed.
The tutorial also walks users through how to interact with the TI Code Composer Studio (CCS) software package. Because of this, it is recommended that users complete this kit before moving onto others.
Organization
The kit will exist in a small container, accessible through the lab technician, Matt Lamparter. Inside the kit will exist the kit reference in hard copy, and all relevant physical materials needed (MSP430, USB cable, etc.). It will also exist in hard copy on the Maker-E Google Drive space here.
On the drive, each kit has its own directory. Inside this directory is the kit reference, and a resources folder. The resources folder will contain extra information like code (both partially completed and entirely completed code), supplementary instructions, and other general extra information.
Lessons Learned
After my first draft of the kit, I sent it around to a few other ECEs to judge its effectiveness in teaching makers about UART. I found from their feedback that I had to revise the tutorial, being more conscious of an audience that does not have the background that I do. I went back and made changes to the tutorial so that it was more accessible, and more useful to those without an ECE background.
Creating this tutorial also gave me a great refresher into how UART is used in TI applications. I have not really had to implement UART since junior year in Microcontrollers (ECEG 347). It was great to relearn how to use such a useful tool.
Relevant Links
- The kit reference can be found on the Maker-E Google Drive space here.
- Much of the material for this tutorial was borrowed from Ben Thompson on his blog.
- To download PuTTY, you can visit the PuTTY downloads page.